How to remove, attach and clean your earbud tips
IMPORTANT: This article applies only to specific products and/or operating systems. Check Applicable Products and Categories for details.
In this article, we'll explain how you can safely and correctly remove, attach and maintain the tips of your earbuds. Because if the earbud tips are damaged or deteriorating, your sound experience suffers: they may not provide full sound quality or noise canceling performance. You also want to avoid earbud fragments stuck in your ear.
How to safely remove earbud tips
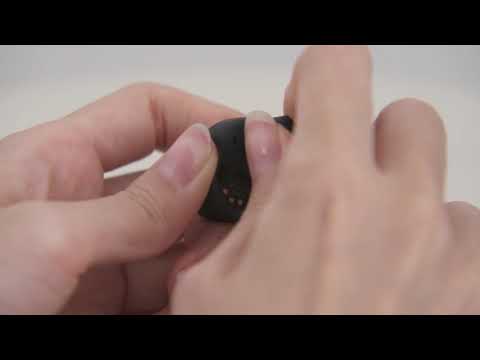
- Hold the earbuds between two fingers
- Twist and rotate the earbud tip while gently pulling
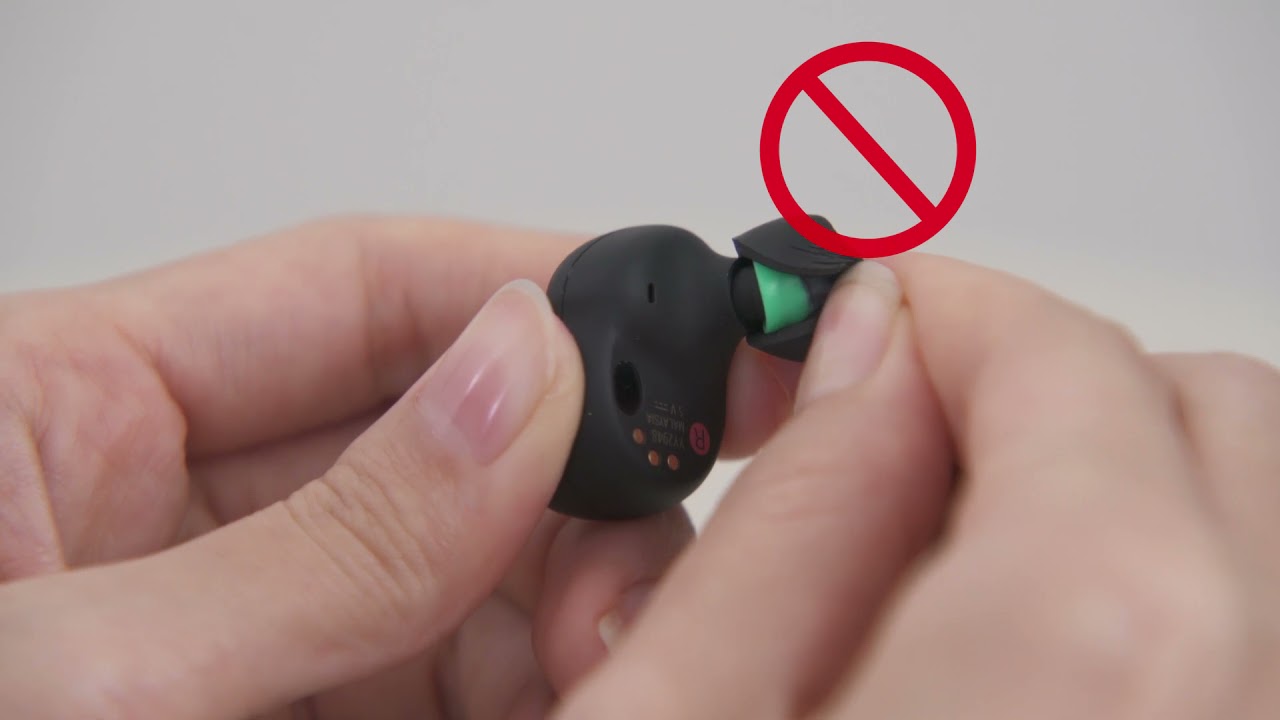
Note: Do not pull on one side of the earbud tip. You could tear or damage the earbud tip.
Here's an example of removing the earbud tips (Taking the WF-1000XM4 model as an example):
- The right approach to removing earbud tips
- The wrong approach to removing earbud tips
How to correctly attach earbud tips
- While holding the outside of the earbud tip with two fingers
- Insert the audio exit in the earbud opening and push firmly down on the tip
- Push it all the way down: make sure that the stem colour on the inside of the earbud is not showing
Check if:
- the earbud tips aren't attached in a skewed manner.
- the earbud tips are inserted firmly all the way.
If the earbud tips are not attached completely, they may come off or adversely affect the sound quality, noise-cancelling performance, and wearability.
Here's an example of attaching the earbud tips (Taking the WF-1000XM4 model as an example):

Hints:
- For foam style tips (Type: model name EP-NI1010), lightly turn over the earbud tips to ensure that they cover the sound output hole completely.
- For foam style tips (Type: model name EP-NI1000), examine the center of the earbud tip to make sure that you can't see the stem colour inside the earbuds. If needed, use a flashlight. The colour inside the earbuds is red, orange, green, and light blue, depending on the size.
How to clean your earbud tips
- When an Earbud Tip is dirty, wipe it with a soft, dry cloth.
- Do not wash the earbud tips in water or with a wet wipe. Doing so can speed up deterioration. IMPORTANT: Do not use solvents such as thinner, benzene, or alcohol, as they may damage the surface.
- Be aware that sharp metal objects, nails, adhesive tape, etc, may damage the earbud tips.
What to do if your earbud tips get damaged
If the earbud tips are damaged, you can consult a Sony dealer or purchase replacement earbud tips, as they're sold separately.
Replacement earbud tip availability may differ per country or region.
Note: Noise isolation earbuds tips are available under the following model names:
- EP-NI1010SS
- EP-NI1010S
- EP-NI1010M
- EP-NI1010L
- EP-NI1000S
- EP-NI1000M
- EP-NI1000L
Notes:
Final Earbud tips & hints
- The foam material may become firm at a low temperature. You can use your hands to warm the earbud tips a little before using them.
- Likewise, when they're very warm, the polyurethane foam may take time to return to its original shape.
- If the bass sound or sound quality has decreased, replace the earbud tips.
- You may hear cracking or popping noises when wearing the headphones. These noises happen because when you wear or adjust the position of the earbuds, air bubbles inside are crushed and restored in response to movements that change the earbuds' shape. It's perfectly normal and not a malfunction.
- As the earbud tips fit more snugly in your ears, you may feel a strain on your ears. If you experience discomfort, take a break or change the size of your earbuds.
- Don't squish the polyurethane foam portion of the earbud tip for long periods. You may permanently deform it.
- When the earbud tips get soaked, drain the liquid well, and make sure that the earbud tips are dried before using or storing them.
- The varying sizes of the holes of the earbud tips (S, M, L) don't affect sound quality.
Register your product
Get access to all information, keep your product up to date and enjoy great deals
Sony Community
Visit our Community and share your experiences and solutions with other Sony customers
Contact support
Contact your Sony Support team
Repair, Warranty & Spare Parts
Book, track or maybe even avoid a repair
Support by Sony (Mobile App)
Never miss an update again! Find information and receive instant notifications about your product

