How to tune or retune my BRAVIA TV (Android TV / Google TV) with a Single or Multiple Satellite Antenna
This guide will help you tune your Sony TV to satellite channels using either a single or multiple antennas.
Before you start
- Ensure you have the basic details of your satellite system, like which satellite you’re receiving or how the signal is distributed from the antenna to the TV.
- You can obtain this information from your broadcast provider or satellite antenna provider.
This process applies to Sony Android TVs and Google TVs, though menu layouts might vary slightly by model. For additional help, refer to your TV's built-in Help Guide or your model’s Support page.
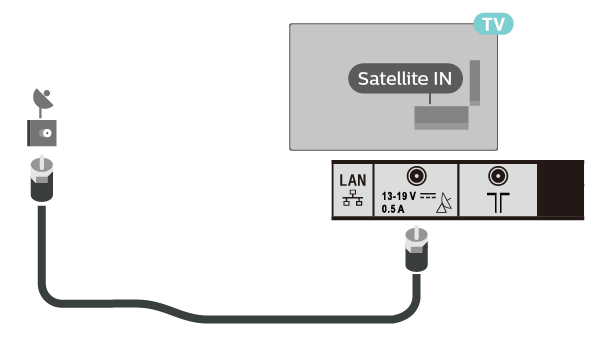
Step 1: Connect your Satellite Antenna
Connect the satellite antenna cable properly to the TV’s Satellite Input (SAT) port.
If using multiple antennas, connect each one according to your setup (e.g., using a DiSEqC switch for multiple feeds).
Step 2: Access Satellite Setup on your TV
Access the Settings menu on your TV. Depending on your TV model, the menu path might slightly differ:
- Settings → Channel Setup → Digital Setup → Satellite Set-up → Digital Satellite Tuning.
- Settings → Channels & Inputs → Channels → Channel setup → Auto tuning.
- Settings → System Settings → Channel Setup → Digital setup → Satellite Setup → Digital Satellite Tuning.
Step 3: Configure Satellite Tuning and Channel List
Depending on your TV model, the following steps may appear in a different order. Follow the prompts as they appear on your screen:
Choose the Satellite Tuning Type:
When prompted, select Yes to start Digital Satellite Tuning. Then choose your antenna configuration:
- Single Antenna: Select Fixed Antenna or Single Cable for setups with one antenna.
- Multiple Antennas: Choose DiSEqC to enable the TV to switch between multiple satellite feeds.
Select the Channel List Type:
You’ll also be asked to choose between Preferred Satellite or General Satellite:
- Preferred Satellite: Includes channels from a specific broadcast provider with preset tuning parameters, simplifying setup.
- General Satellite: Displays all available channels from the selected satellite and allows full customisation of tuning parameters.
Recommendation: For simplicity, choose Preferred Satellite. If your provider isn’t listed, go back and select General Satellite for a manual setup.
Step 4: Select Provider and Configure Network Parameters
For Preferred Satellite:
- A list of providers will appear. Select your satellite provider to continue.
- The tuning will begin. Wait for a notification confirming the tuning is complete.
For General Satellite:
- Select Satellite 1 and set it to ON.
- Set Scan Type to Full.
- Go to Satellite Selection and choose your satellite.
- In LNB Configuration, set DiSEqC Control to A and check the signal strength and quality bars. They should be near the maximum.
- Repeat for Satellite 2, 3, or 4 if needed, setting DiSEqC Control to B, C, or D, respectively.
If the signal strength is low, you may need to adjust LNB Voltage, DiSEqC Control, or Polarization in Transponder Settings.
About Transponder settings or Advanced Settings
Step 5: Start Tuning
Once settings are configured, select Start to begin tuning. The process may take up to an hour, especially with a full scan for multiple satellites.
Register your product
Get access to all information, keep your product up to date and enjoy great deals
Sony Community
Visit our Community and share your experiences and solutions with other Sony customers
Contact support
Contact your Sony Support team
Repair, Warranty & Spare Parts
Book, track or maybe even avoid a repair
Support by Sony (Mobile App)
Never miss an update again! Find information and receive instant notifications about your product

